AI Prompts for Photo Editing: A Practical Guide to Better, More Controlled Edits
Learn how to write precise AI photo editing prompts that control what changes, protect key details, and help you fix imperfect edits step by step.
AI photo editing can feel magical when it works. You upload a photo, type a few words, and the background changes, the lighting improves, or a distracting object disappears.
But it can also go wrong fast.
You ask the AI to make a headshot look more professional, and it changes the person's face. You ask it to improve a product photo, and the product shape shifts. You ask it to remove one object, and the background starts looking fake.
The problem is usually not that your idea is bad. The problem is that the prompt is too vague for the edit you want.
A good AI photo editing prompt does not just describe a nice-looking result. It tells the AI:
What to change
Where to change it
What must stay the same
What style or use case the image is for
What to fix if the first result is not right
This guide will show you how to write clearer AI prompts for photo editing, when to use selection or mask tools, and how to fix common AI editing problems without starting over.
What Is an AI Prompt for Photo Editing?
An AI photo editing prompt is a text instruction that tells an AI tool how to change an existing image.
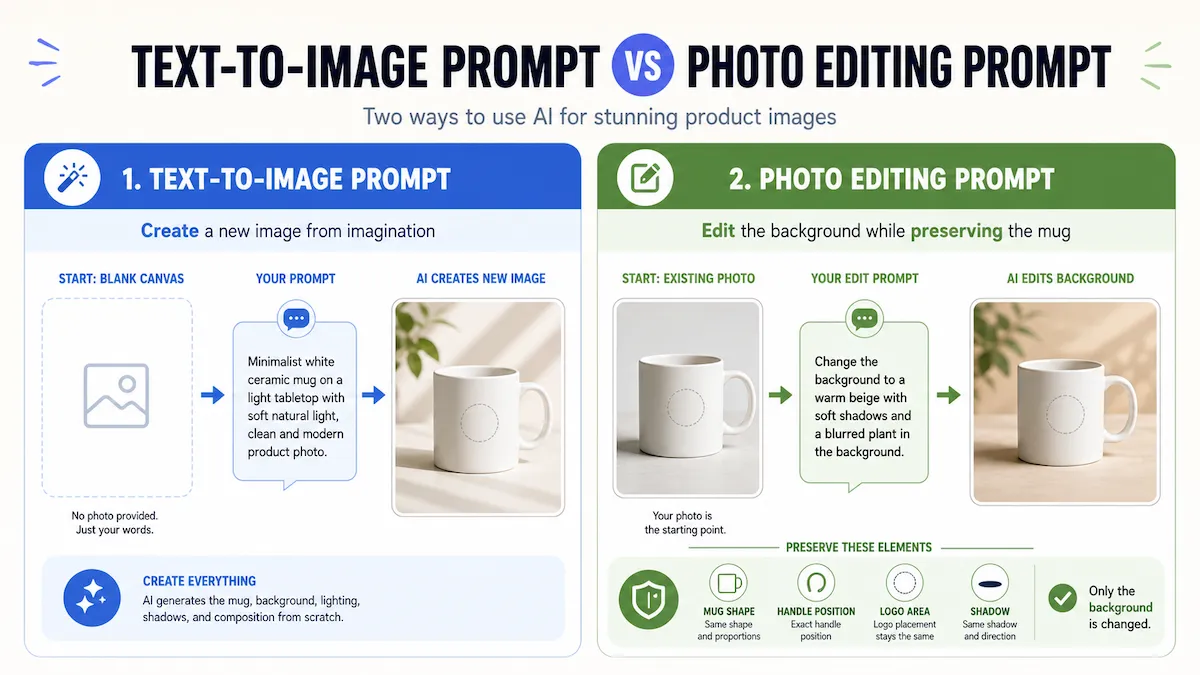
That is different from a text-to-image prompt.
A text-to-image prompt starts from nothing. For example:
A minimalist product photo of a white ceramic mug on a marble table, soft morning light.
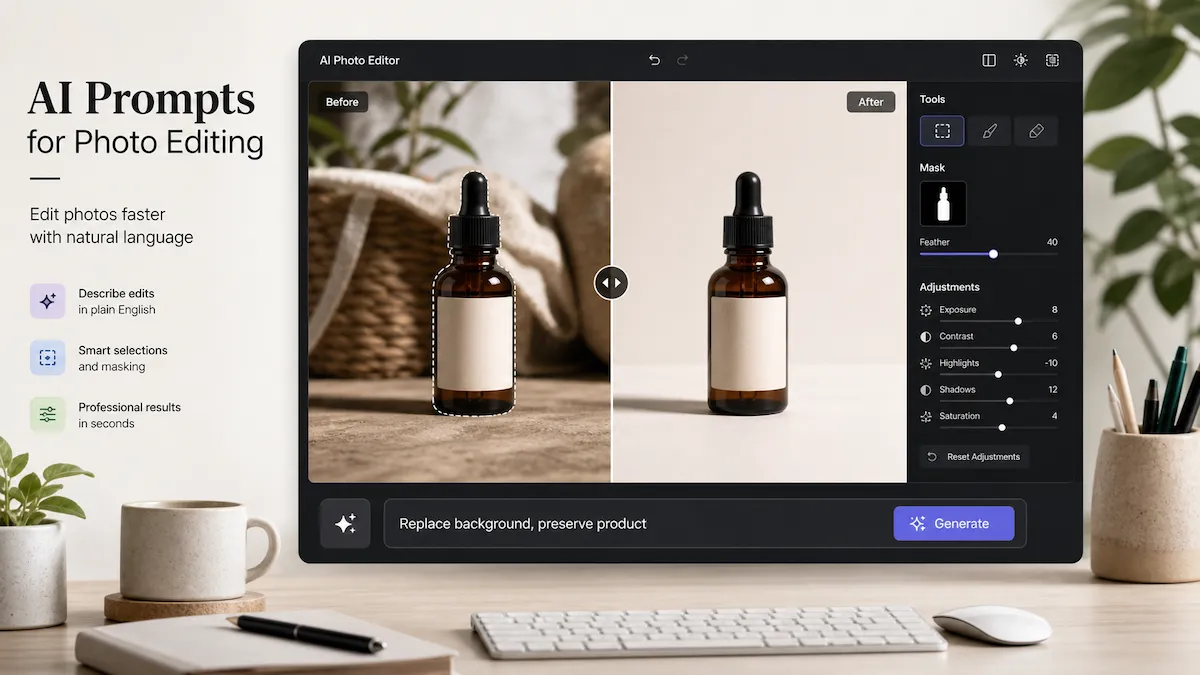
A photo editing prompt starts with an image you already have. For example:
Replace the background with a clean marble table scene, while keeping the mug shape, handle, logo, and shadow realistic.
The second prompt is more specific because the AI has to edit a real photo. It needs to know what can change and what should not change.
That is the most important mindset shift: photo editing prompts are not just about imagination. They are about control.
Why AI Photo Editing Prompts Often Fail
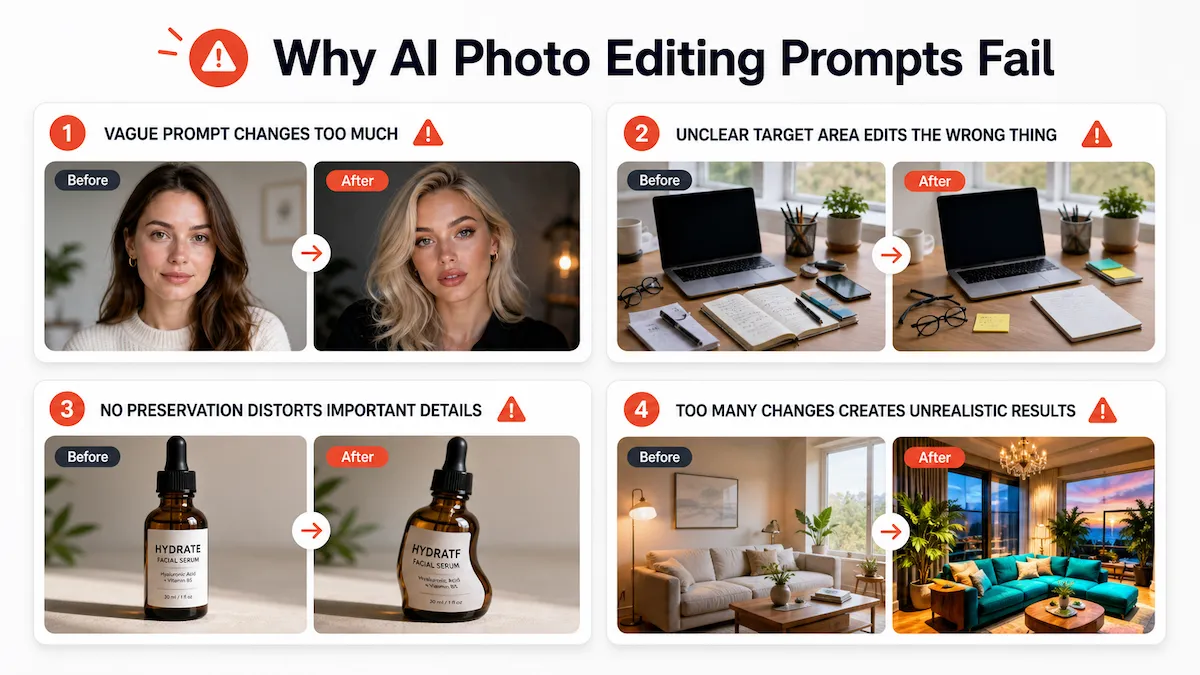
Most bad AI edits come from unclear instructions. Here are the most common reasons.
The Prompt Describes the Result, Not the Edit
A prompt like this sounds reasonable:
Make this photo look professional.
But "professional" can mean many things. It could mean brighter lighting, smoother skin, a cleaner background, a different outfit, sharper contrast, or a more polished composition.
The AI may try to improve everything at once. That is when faces, product details, backgrounds, and colors can drift.
A better prompt names the actual edit:
Improve the lighting and contrast so the photo looks like a clean professional headshot. Keep the person's face, hair, skin tone, expression, and clothing unchanged.
The Target Area Is Unclear
If you want to edit one part of the image, say so.
Instead of:
Remove the clutter.
Write:
Remove the papers and coffee cup from the desk in the lower right corner. Keep the laptop, hands, and background unchanged.
For local edits, a selection or mask tool is often even better. Many AI image editors now let you select part of an image before writing the prompt. That gives the AI a clearer boundary.
The Prompt Does Not Say What to Preserve
AI tools are good at creating plausible images. That does not always mean they preserve the exact image you started with.
If you care about a face, product, logo, label, texture, pose, or layout, say that directly.
For example:
Change the background to a bright kitchen counter scene. Preserve the product shape, label text, logo, bottle cap, color, and exact proportions.
Preservation instructions are especially important for:
Product photos
Brand images
Headshots
Real estate photos
Ads
Images with text or logos
The Prompt Asks for Too Many Changes at Once
This is a common mistake:
Remove the background, make the lighting warmer, add a luxury interior, retouch the model, change the outfit, crop it for Instagram, and make it more premium.
That is not one edit. It is a full creative direction.
You will usually get better results by splitting the job into smaller steps:
Replace the background.
Adjust the lighting.
Refine the subject.
Crop for the platform.
Fix any details.
Smaller edits are easier to review and easier to correct.
The Tool Needs a Selection or Mask
Some edits are too local for a broad prompt.
If you want to remove one object, replace part of a background, fix a hand, or change only one product detail, use a selection or mask if your tool supports it.
For example, ChatGPT's image editor lets users upload or select an image, then edit either by selecting part of the image or by describing the change directly. Adobe Photoshop's Generative Fill is built around selecting an area and using a text prompt to alter that part of the image. Midjourney's Vary Region also focuses on selecting a region and regenerating that area.
The general rule is simple:
Use a prompt for broad direction. Use a selection or mask for local control.
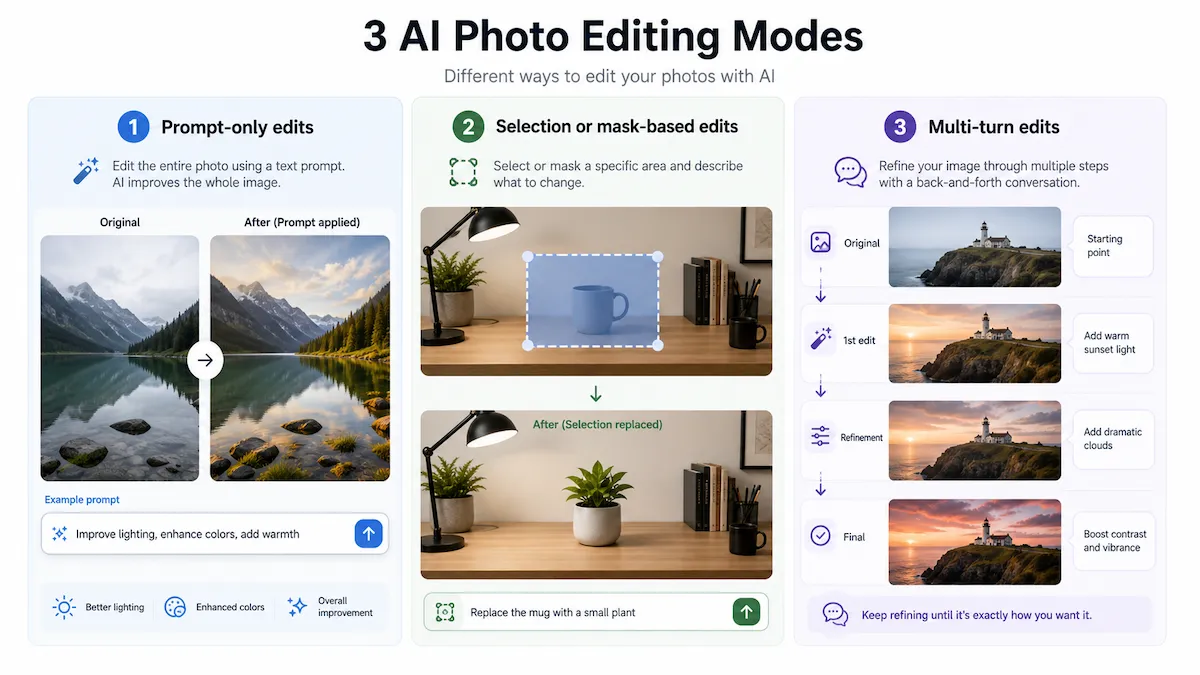
The 3 Editing Modes You Should Understand First
Before writing a prompt, choose the right editing mode.
1. Prompt-Only Edits
Prompt-only editing means you describe the change in text without selecting a specific area.
This works best for broad edits like:
Making lighting softer
Adjusting the mood
Making a photo look more editorial
Improving the background atmosphere
Creating a more polished overall look
Changing the image style
Example:
Make the photo look brighter and cleaner, with soft natural light and realistic colors. Keep the person, pose, clothing, and background layout unchanged.
Prompt-only edits are easy to try, but they give the AI more freedom. If the tool changes too much, move to a more specific prompt or use a selection.
2. Selection or Mask-Based Edits
Selection or mask-based editing means you highlight the area you want to change, then write a prompt for that area.
This works best for:
Removing an object
Replacing part of a background
Fixing a small mistake
Adding an object to a specific place
Repairing a product photo
Changing one part of an outfit or scene
Example:
Fill this selected area with a clean white wall that matches the lighting and perspective of the rest of the photo.
The selection tells the AI where to work. The prompt tells it what to create.
3. Multi-Turn Edits
Multi-turn editing means you improve the image step by step.
Instead of trying to get the perfect result in one prompt, you ask for one edit, review it, then ask for a focused refinement.
Example first prompt:
Replace the background with a clean home office setting. Keep the person's face, hair, clothing, pose, and camera angle unchanged.
Example refinement prompt:
Keep the current background, but make the lighting on the person's face softer and more natural. Do not change the face shape or expression.
This is often the best workflow for real images. It gives you more control and makes mistakes easier to fix.
The AI Photo Editing Prompt Formula

Use this formula when you write a photo editing prompt:
Intent + target area + preservation constraints + visual style + output constraints
Here is what each part means.
Prompt part | What it answers | Example |
|---|---|---|
Intent | What do you want to change? | Replace the background |
Target area | Where should the edit happen? | Behind the product |
Preservation constraints | What must stay the same? | Keep the product shape, label, logo, and shadow |
Visual style | What should it look like? | Clean studio lighting, realistic white surface |
Output constraints | What is the image for? | Square crop for an ecommerce listing |
A full prompt might look like this:
Replace the background behind the product with a clean white studio setup. Keep the product shape, label, logo, color, texture, and shadow realistic. Make the image bright, sharp, and suitable for a square ecommerce listing.
This prompt works better than "make this product photo look professional" because it gives the AI a job, a boundary, and a quality standard.
A Better Workflow for AI Photo Editing Prompts
Use this workflow whenever you care about the final image quality.
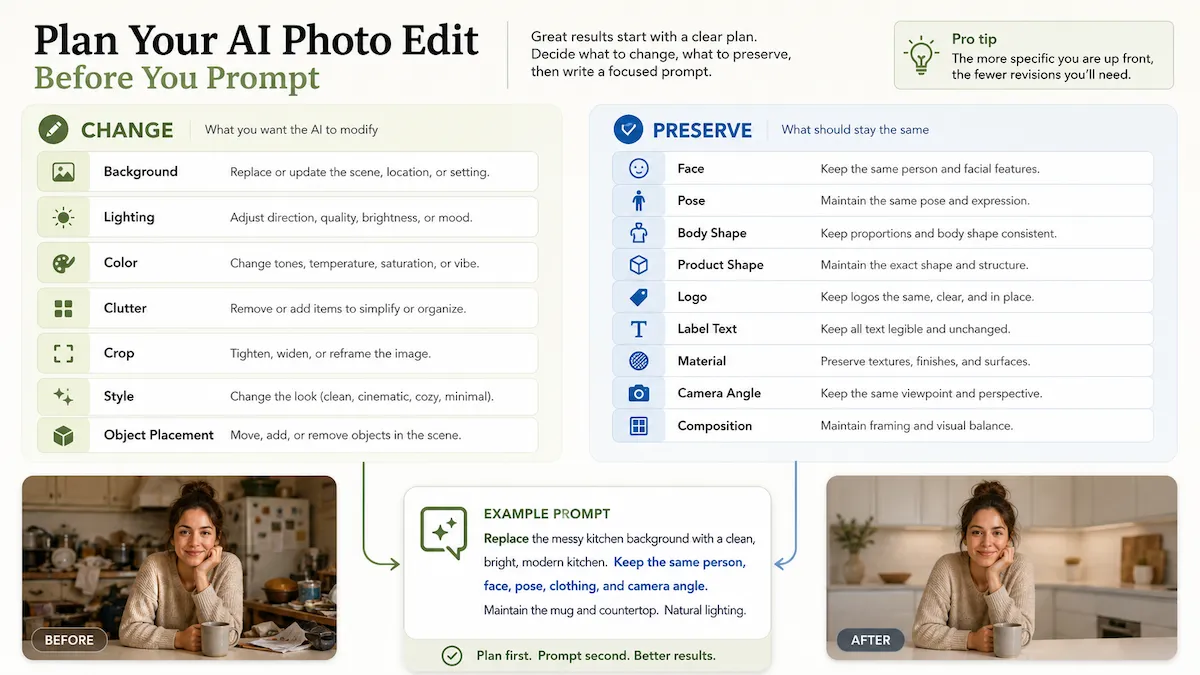
Step 1. Decide What Should Change and What Must Stay the Same
Before you type anything, make two short lists.
What should change?
Background
Lighting
Color
Clutter
Crop
Style
Object placement
What must stay the same?
Face
Pose
Body shape
Product shape
Logo
Label text
Material
Camera angle
Composition
This step prevents the AI from treating your image as a loose suggestion.
Example:
Change: the messy kitchen background.
Preserve: the person, face, hair, outfit, hands, pose, and camera angle.
That turns into:
Replace the messy kitchen background with a clean, softly lit neutral interior. Keep the person, face, hair, outfit, hands, pose, and camera angle unchanged.
Step 2. Choose Prompt-Only or Selection-Based Editing
Ask yourself: do I want to change the whole image or one part of it?
Use prompt-only editing when the whole image needs a general improvement:
Make this photo brighter and more natural, with balanced exposure and realistic skin tones. Keep all people, objects, and the background layout unchanged.
Use selection or mask-based editing when only one area should change:
Replace only the selected area with a smooth, clean wall that matches the existing light and perspective.
If you are editing a product, face, logo, or text, local control is usually safer.
Step 3. Write the First Prompt Using the Formula
Do not try to sound clever. Try to be clear.
Use this simple structure:
Edit [target area] to [desired result], while preserving [specific details], with [style or output constraints].
Example:
Edit the background behind the skincare bottle to look like a clean bathroom counter, while preserving the bottle shape, label text, logo, cap, and realistic shadow. Use soft natural light and keep the final image suitable for an ecommerce product page.
This gives the AI a strong first direction.
Step 4. Review the Edit Carefully
Before downloading or publishing the image, check the details.
For people, check:
Face identity
Skin tone
Hands
Teeth
Eyes
Hairline
Expression
Body shape
For products, check:
Shape
Material
Logo
Label text
Color
Size
Shadow
Reflections
For any image, check:
Lighting direction
Perspective
Background realism
Cropping
Text readability
Whether anything important changed by accident
AI edits can look good at first glance and still be wrong in the details.
Step 5. Use Refinement Prompts One Issue at a Time
If the first result is close but not right, do not rewrite everything. Fix one problem.
Instead of:
This is wrong. Make it better and more realistic.
Write:
Keep the current background and product exactly the same. Only soften the shadow under the product so it looks more natural.
Or:
Keep the current edit, but restore the original logo and label text on the bottle. Do not change the background or lighting.
Refinement prompts work best when they are narrow.
Prompt Templates by Editing Goal
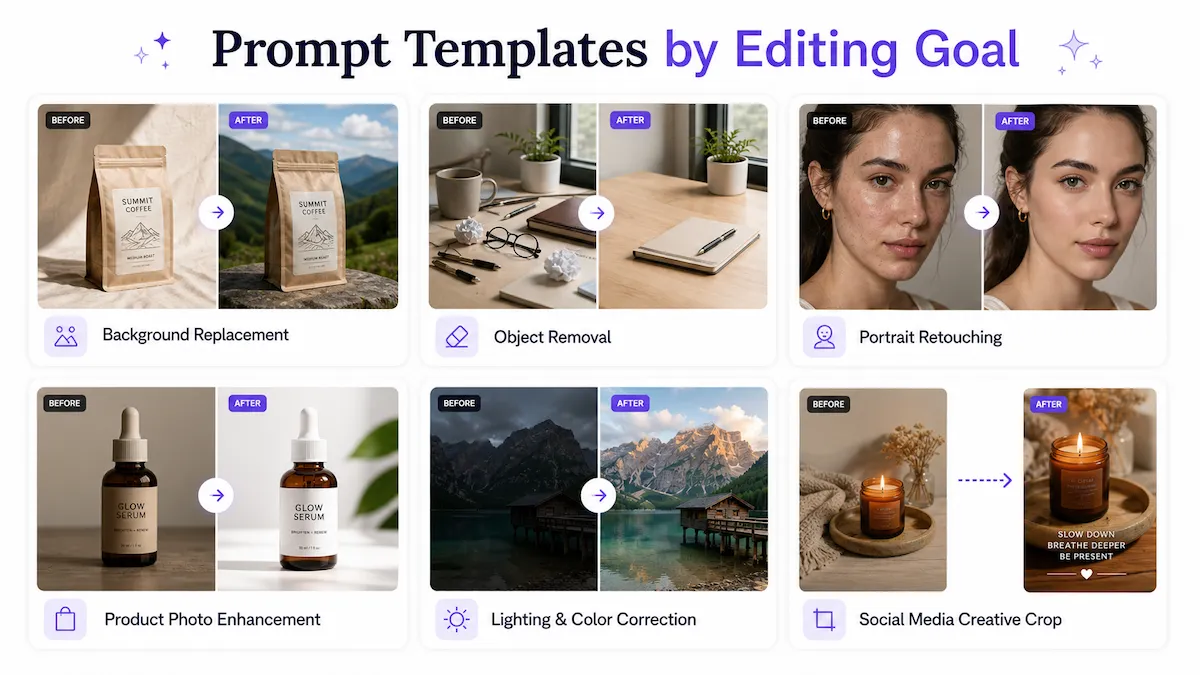
Use these templates as starting points. Replace the bracketed text with your own details.
Background Replacement Prompt
Use this when you want to change the background while keeping the main subject.
Prompt skeleton:
Replace the background with [new background]. Keep [main subject] unchanged, including [important details]. Match the lighting, shadows, perspective, and realism of the original photo.
Example:
Replace the background with a clean modern kitchen counter. Keep the coffee bag unchanged, including its shape, label, logo, color, and texture. Match the lighting, shadows, perspective, and realism of the original photo.
Refinement prompt:
Keep the product and background the same. Only adjust the shadow so the product looks naturally placed on the counter.
Object Removal Prompt
Use this when something distracting should disappear.
Prompt skeleton:
Remove [object] from [specific area]. Fill the area naturally so it matches the surrounding [background, texture, light, or pattern]. Keep everything else unchanged.
Example:
Remove the coffee cup from the lower right corner of the desk. Fill the area naturally so it matches the wood texture and lighting. Keep the laptop, notebook, hands, and background unchanged.
Refinement prompt:
Keep the removed object gone, but make the repaired desk texture smoother and more consistent with the surrounding wood grain.
Portrait Retouching Prompt
Use this when you want a cleaner portrait without changing the person.
Prompt skeleton:
Improve [lighting, background, or skin detail] while keeping the person's face, identity, expression, skin tone, hair, clothing, and pose unchanged. Make the result natural and realistic.
Example:
Improve the lighting so this looks like a natural professional headshot. Keep the person's face, identity, expression, skin tone, hair, clothing, and pose unchanged. Make the result realistic, not overly retouched.
Refinement prompt:
Keep the face and expression unchanged. Only reduce the harsh shadow on the left side of the face.
Product Photo Enhancement Prompt
Use this for ecommerce, ads, catalogs, or product landing pages.
Prompt skeleton:
Enhance this product photo for [use case]. Keep the product shape, proportions, material, logo, label text, color, and key details unchanged. Improve [background, lighting, shadow, or sharpness] in a realistic way.
Example:
Enhance this product photo for an ecommerce listing. Keep the product shape, proportions, material, logo, label text, color, and cap unchanged. Improve the background, lighting, shadow, and sharpness in a realistic studio style.
Refinement prompt:
Keep the product exactly the same. Only make the background cleaner and more neutral.
Lighting and Color Correction Prompt
Use this when the photo is too dark, too flat, too yellow, or too harsh.
Prompt skeleton:
Adjust the lighting and color so the image looks [desired look]. Keep all people, objects, composition, and background details unchanged. Make the edit natural and realistic.
Example:
Adjust the lighting and color so the image looks bright, clean, and naturally lit. Keep all people, objects, composition, and background details unchanged. Make the edit realistic with balanced skin tones.
Refinement prompt:
Keep the current edit, but make the color temperature slightly cooler and reduce the orange tint.
Social Media Creative Prompt
Use this when the image needs to fit a platform or campaign.
Prompt skeleton:
Edit this image for [platform or use case]. Keep [main subject] unchanged. Create [style or background], leave space for [text or layout need], and make the final image [aspect ratio or format].
Example:
Edit this image for an Instagram product post. Keep the candle jar unchanged, including the label and shape. Create a warm lifestyle background with soft evening light, leave clean space at the top for text, and make the composition work in a square crop.
Refinement prompt:
Keep the product and background the same. Add more empty space above the product for a short headline.
Style Transfer Prompt
Use this when you want a new visual style but still need the image to stay recognizable.
Prompt skeleton:
Apply a [style] look to the image while preserving [subject, face, product, composition, text, or logo]. Keep the result realistic and avoid changing key details.
Example:
Apply a clean editorial magazine look to this portrait while preserving the person's face, expression, skin tone, hair, clothing, and pose. Keep the result realistic and avoid changing facial features.
Refinement prompt:
Keep the editorial style, but reduce the smoothing on the face so the skin texture looks more natural.
Tool-Specific Prompt Advice Without Overcomplicating It
Different AI photo editors handle prompts in different ways. You do not need to memorize every feature. Just understand what each type of tool is good for.
Use Conversational Tools for Iterative Editing
Tools like ChatGPT and Gemini are useful when you want to work through an edit in conversation.
This can be helpful when you want to:
Try a first edit
Ask for a small change
Compare different directions
Refine the same image step by step
Explain what went wrong in plain language
For conversational editing, write prompts like:
Keep the current version, but make the background less busy and more neutral. Do not change the person, clothing, face, or pose.
Conversational tools are especially useful when you do not know the final look yet.
Use Selected-Region Tools for Local Edits
Tools such as Photoshop Generative Fill and Midjourney Vary Region are better suited to local edits where you select an area first.
Use this approach when you want to:
Remove one object
Replace one part of a scene
Add something to a specific area
Fix a small mistake
Avoid changing the rest of the image
For selected-region editing, keep prompts short and direct:
Clean white wall, matching the original lighting.
Or:
Natural wooden tabletop, same perspective and shadow direction.
When the area is already selected, the prompt does not need to describe the whole image again.
Use Product-Focused Tools for Ecommerce Workflows
Product-focused tools such as Canva and Editpal are useful when your main goal is to create product photos, backgrounds, social posts, or catalog images.
These tools are often built around tasks like:
Removing backgrounds
Creating AI-generated backgrounds
Applying similar edits to many product images
Preparing images for shops, ads, or social media
Keeping a catalog visually consistent
For product workflows, your prompt should protect the item:
Create a clean studio background with soft shadows. Keep the product shape, color, material, logo, label text, and proportions unchanged.
Product prompts should be less about creativity and more about accuracy.
Troubleshooting: Better Prompts for Common AI Photo Editing Problems
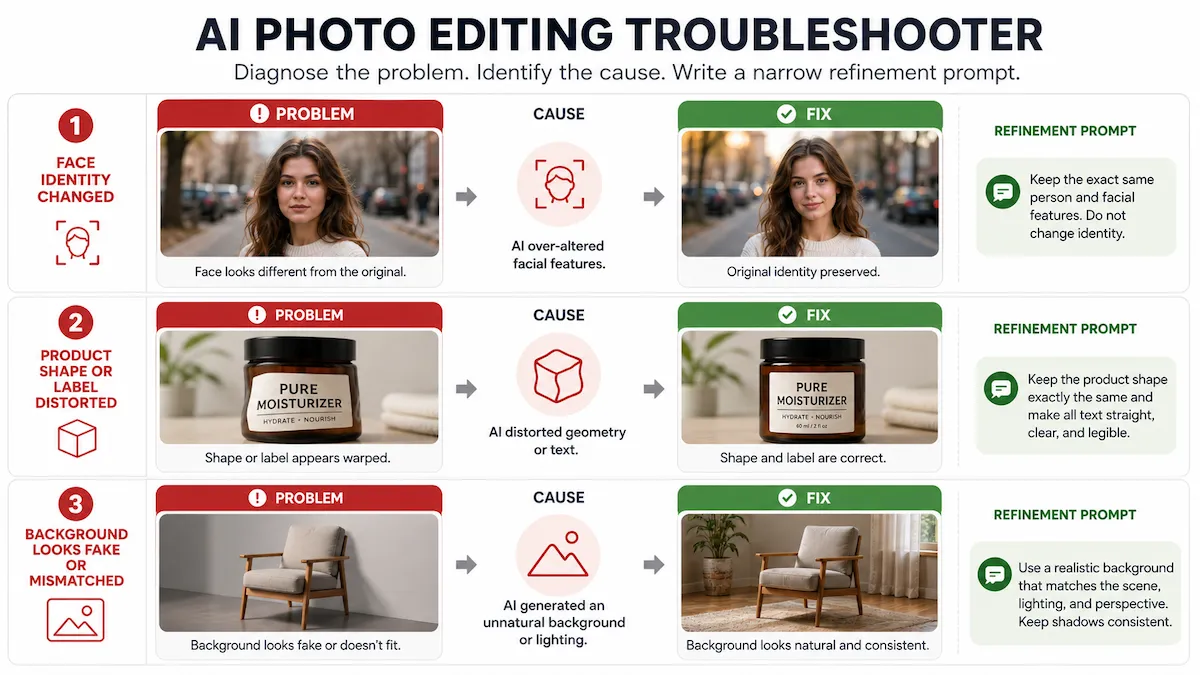
If an edit goes wrong, use the problem to write a better refinement prompt.
Problem | What likely went wrong | What to add to your prompt | Example refinement prompt |
|---|---|---|---|
The person no longer looks like themselves | The prompt did not protect identity | Preserve face, expression, skin tone, hair, and age | Keep the current background, but restore the original face, expression, skin tone, and hair. |
The product shape changed | The AI treated the product as flexible | Preserve shape, proportions, material, logo, and label | Keep the background, but restore the exact original product shape, logo, label text, and proportions. |
The logo or text is unreadable | AI often struggles with small text | Ask to preserve or restore original text, then review manually | Restore the original label text and logo. Do not invent or rewrite any text. |
The edit looks fake | The style prompt was too strong | Ask for realistic lighting, shadows, and texture | Make the edit more realistic with natural shadows and less dramatic color grading. |
The background does not match | Lighting or perspective changed | Match light direction, camera angle, and depth | Keep the background idea, but match the original camera angle and light direction. |
The tool ignores part of the prompt | Too many instructions at once | Split the edit into smaller steps | Only change the background. Do not adjust the person, clothing, pose, or lighting yet. |
Batch edits look inconsistent | Each image was interpreted separately | Use a repeatable prompt and fixed style constraints | Apply the same clean white studio background, soft shadow, and neutral lighting to each product image. |
The key is to avoid emotional feedback like "make it better." Name the problem and give one fix.
Safety, Commercial Use, and Manual Review
AI photo editing is useful, but it is not a replacement for judgment.
Before using AI-edited photos in ads, ecommerce listings, client work, or public campaigns, review the image carefully.
Pay special attention to:
Faces and identity
Product accuracy
Logos and trademarks
Label text
Claims shown in the image
Model likeness and permissions
Customer or client assets
Private or unreleased products
Platform rules for AI-generated or AI-edited content
If the photo includes a real person, make sure you have the right to edit and use the image. If the photo includes a client product, brand asset, or unreleased design, check whether it can be uploaded to the tool you are using.
Also remember that some tools may apply labels, metadata, watermarks, or content credentials to AI-edited images. The details vary by product and can change, so check the tool's current documentation before publishing important commercial work.
Quick Prompt Checklist Before You Generate
Before you run an AI photo edit, ask these questions:
Did I define the exact edit?
Did I name the target area?
Did I say what must stay unchanged?
Did I choose prompt-only or selection/mask editing?
Did I limit the prompt to one main change?
Did I mention the style or use case?
Did I include output needs such as crop, platform, or background?
Did I review identity, product details, logos, text, lighting, and realism?
If your prompt answers those questions, it is already better than most AI photo editing prompts.
FAQs About AI Photo Editing Prompts
What should I include in an AI photo editing prompt?
Include the edit you want, the target area, what must stay the same, the visual style, and the final use case. A strong prompt is specific about both change and preservation.
Are AI photo editing prompts different from image generation prompts?
Yes. Image generation prompts describe a new image. Photo editing prompts describe how to change an existing image. That means you need preservation instructions, such as "keep the face unchanged" or "preserve the product logo and shape."
How do I prompt AI to edit only one part of a photo?
If your tool supports it, select or mask the part you want to edit first. Then write a short prompt for that area. If you cannot select an area, name the location clearly in the prompt, such as "the upper left background" or "the table area under the product."
How do I keep the same face in an AI edit?
Tell the AI to preserve the person's identity, face shape, expression, age, skin tone, hair, and pose. Review the result carefully. For important portraits, use small refinements instead of major style changes.
Example:
Improve the lighting while preserving the person's identity, face shape, expression, skin tone, hair, and pose. Do not beautify or change facial features.
How do I keep the same product in an AI edit?
Tell the AI to preserve the product shape, proportions, color, material, logo, label text, and key details. Product images need extra review because even small changes can misrepresent what you sell.
Example:
Replace the background with a clean studio setting while preserving the exact product shape, proportions, color, material, logo, label text, and shadow.
Why does AI ignore my prompt?
Your prompt may be too long, too vague, or asking for too many changes at once. Try splitting the edit into smaller steps. If you want a local change, use a selection or mask.
Can I use AI photo edits for ads or ecommerce?
Often, yes, but you should review the image carefully and check the rules for your tool, platform, brand, and region. Make sure the image does not change the product, misrepresent a person, distort a logo, or create misleading claims.
Better Prompts Come From Smaller Edits
The best AI prompts for photo editing are not magic words. They are clear instructions.
Start with one edit. Name the area. Say what should change. Say what must stay the same. Then review the result and refine one issue at a time.
That simple workflow will help you get cleaner backgrounds, better portraits, stronger product photos, and more reliable AI edits without losing control of the original image.